Laravel Toolkit
summary
Laravel Toolkit is a free Plesk extension you can use to simplify routine tasks related to hosting Laravel applications.
In this topic you will learn how to upload, configure, and run Laravel applications in Plesk. Note that this topic presumes that you already have your application ready, or are planning on creating one. This is not a guide on how to create Laravel applications.
Prerequisites
Before you can host Laravel applications, the free Laravel Toolkit extension must be installed on the Plesk server:
- If you are the Plesk administrator, install the extension from the Extensions Catalog.
- Otherwise, contact your hosting provider and ask them to install the extension for you.
Once the extension is installed, you are ready to begin. You will see the Laravel button in the drawer on the left side of the screen, and also the Install Laravel Application button on the domain cards of all your domains.


Uploading Your Application
Before you can configure and run your application, you need to upload it to the Plesk server and register it in Laravel Toolkit. There are three ways of doing this:
- Create a Laravel skeleton. If your application is stored in a folder or a compressed file on your computer, or if you are looking to create your application from scratch, Laravel Toolkit can create the necessary directory structure, and also a local Git repository.
- Install from a remote Git repository. If your application is stored in a remote repository, you can deploy it to the Plesk server.
- Scan for an existing application. If you have already uploaded your application to Plesk, you can register your application in Laravel Toolkit by scanning for it.
Note
To be able to create a Laravel skeleton or to install from a remote Git repository, the free Git extension must be installed on the Plesk server.
Creating a Laravel skeleton
- Log in to Plesk.
- Go to Websites & Domains, find the domain that will host your application, and then click Install Laravel Application.
- Select “Install Skeleton”, and then click Install Application.
- Once the skeleton has been installed, you need to upload your application files to Plesk (for example, using FTP or File Manager), replacing the default files as necessary.
Installing from a remote Git repository
- Log in to Plesk.
- Go to Websites & Domains, find the domain that will host your application, and then click Install Laravel Application.
- Select “Install from remote repository”.
- Type or paste the URL of the remote repository containing your application’s files.
- If the remote repository requires authentication, add the public key you see on this page to the repository.
- Click Install Application.
Scanning for an existing application
- Log in to Plesk.
- Go to Websites & Domains, find the domain that will host your application, and then open the “Hosting & DNS” tab.
- Click Hosting Settings.
- Change the “Document root” value to match the path to your application’s public directory
(by default,
/httpdocs/public), and then click OK. - Click Install Laravel Application, click Cancel, and then click Scan.
Once you have uploaded or deployed your application’s files and your application has been registered in Laravel Toolkit, the Install Laravel Application button is replaced with the Manage Laravel Application button for the domain hosting your application.

You can now proceed to the next step.
Running Artisan, Composer, and Node.js Commands
To manage your Laravel application, you will likely need to run Artisan, Composer, and/or Node.js commands. Laravel Toolkit makes it easy to run them from the Plesk interface with no need for shell access.
If you are unsure whether you need to run any Artisan, Composer, and/or Node.js commands for your application to run properly, consult the person or organization that provided you with the application.
Note
To be able to run Node.js commands, the free Node.js extension must be installed on the Plesk server.
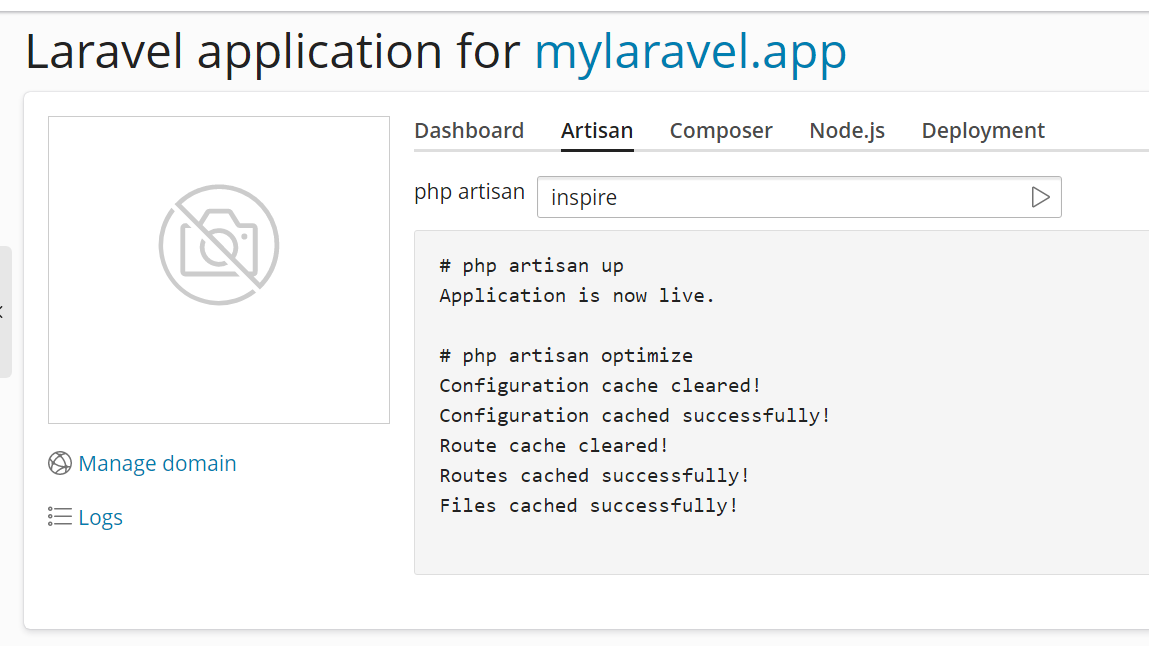
Running an Artisan, Composer, or Node.js command
Go to Websites & Domains, find the domain hosting your application, and then click Manage Laravel Application.
Go to the corresponding tab, type in the command you want to run or select one from the list, and then press the Enter key or click the
 button.
Note
When running Node.js commands, you may need to specify a particular Node.js version and/or package manager for the command to have the desired effect. If you are unsure what to choose, consult the person or organization that provided you with the application.
Viewing Your Application’s Log Files
As it runs, your Laravel application writes its log to a separate log file. You can see the contents of that file straight from the Laravel Toolkit interface to make monitoring your application and troubleshooting whatever issues that may come up easier.
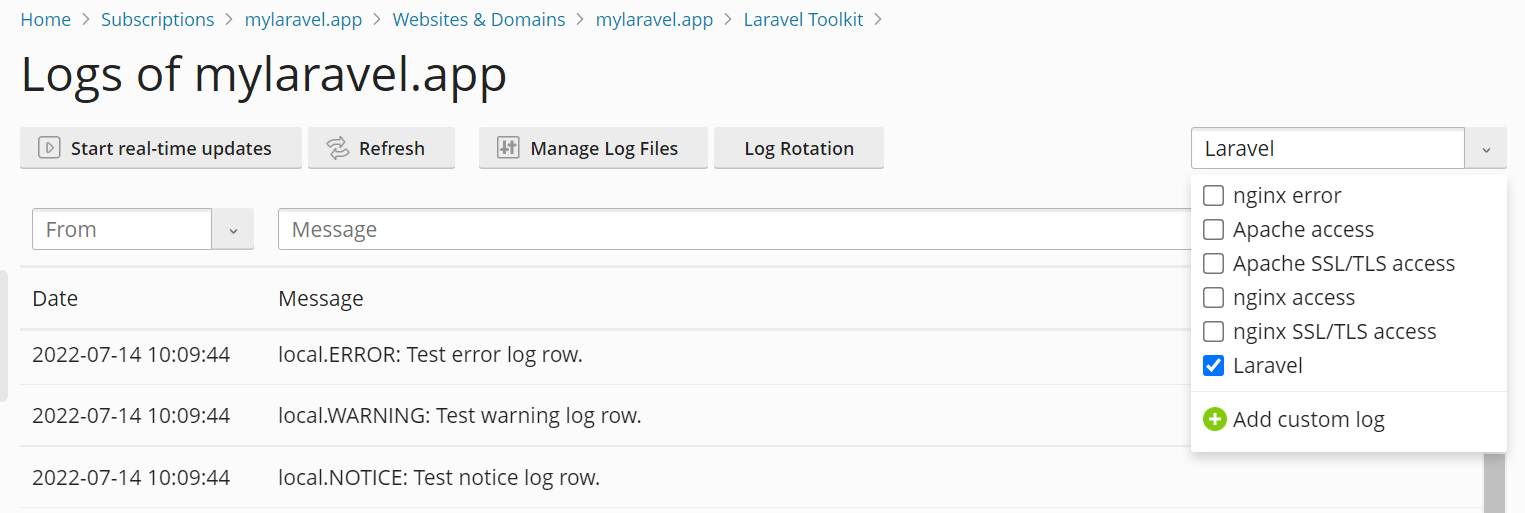
Viewing your application’s log
- Log in to Plesk.
- Go to Websites & Domains, find the domain hosting your application, and then click Manage Laravel Application.
- Click Logs.
This will open the domain log browser showing only the log entries from the Laravel log.
Viewing Your Application’s Scheduled Tasks
With Laravel, you can schedule tasks inside the application’s code instead of using an external scheduler, such as cron. With Laravel Toolkit, you can see all currently configured scheduled tasks straight from the Laravel Toolkit interface, and also enable or disable Laravel scheduled tasks.
Note
You cannot add, remove, or edit Laravel scheduled tasks from the Laravel Toolkit interface. Learn how to schedule tasks inside the application’s code

Viewing your application’s scheduled tasks
- Log in to Plesk.
- Go to Websites & Domains, find the domain hosting your application, and then click Manage Laravel Application.
- Go to the “Scheduled Tasks” tab (the tab is only visible when there is one or more scheduled tasks configured).
Note
To be able to enable or disable your application’s scheduled tasks, you need to perform a particular operation first, depending on whether you are running Plesk for Linux or Plesk for Windows. You need to do it for every domain hosting a Laravel application whose scheduled tasks you want to run.
Enabling scheduled tasks management in Plesk for Linux
- Log in to Plesk.
- Go to Websites & Domains, find the domain hosting your application, go to the “Hosting & DNS” tab, and then click Web Hosting Access.
- Under “Access to the server over SSH”, select any option other than “Forbidden”, and then click OK.
Enabling scheduled tasks management in Plesk for Windows
- Log in to Plesk.
- Go to Websites & Domains and find the domain hosting your application.
- Under “Account”, click Customize.
- Go to the “Permissions” tab, select the checkbox next to “Scheduler management”, and then click Update & Lock.
You can now enable or disable your application’s scheduled tasks.
Enabling your application’s scheduled tasks
- Log in to Plesk.
- Go to Websites & Domains, find the domain hosting your application, and then click Manage Laravel Application.
- Click the Scheduled Tasks toggle button so that it shows “Enabled”.
Scheduled tasks are now enabled for your Laravel application.
Editing the Environment Variables
Your application may need one or more custom environment variables to run properly, or it may change its behavior depending on the environment variables that have been set. If you are unsure whether your application needs any environment variables to run properly, consult the person or organization that provided you with the application.
Editing environment variables
- Log in to Plesk.
- Go to Websites & Domains, find the domain hosting your application, and then click Manage Laravel Application.
- Click the Edit button next to “Environment variables (.env)”.
- Edit the environment variables as necessary, and then click Update.
The updated environment variables are now in effect.
Putting Your Application in Maintenance Mode
To prevent website visitors from seeing errors while you are working on or updating your application, you can put it in maintenance mode. While your application is in maintenance mode, website visitors will see a page showing a “503 SERVICE UNAVAILABLE” error.
Putting your application in maintenance mode
- Log in to Plesk.
- Go to Websites & Domains, find the domain hosting your application, and then click Manage Laravel Application.
- Click the Maintenance mode toggle button so that it shows “Enabled”.
Your Laravel application is now in maintenance mode.
Note
Do not forget to take your application out of maintenance mode once you have finished working on or updating it.
Updating Your Application
Whether your Laravel application’s files are stored in a local or a remote Git repository, you need to make sure that the changes made to the application’s code are propagated to the Plesk server. You can choose between deploying the changes manually or automatically.
If you need precise control over when your application is updated, we recommend updating it manually. This way, no changes made to the application’s code in the repository are propagated to the Plesk server until you are ready to do so. The downside of this approach is that you must perform manual actions every time the application needs to be updated.
Updating your application manually
- Log in to Plesk.
- Go to Websites & Domains, find the domain hosting your application, and then click Manage Laravel Application.
- Go to the “Deployment” tab and, under “Deployment mode”, select the “Manual” radio button.
- Under “Deployment scenario”, clear the checkboxes corresponding to the steps you do not want to run during deployment, and then click Deploy.
Once Laravel Toolkit has run through all the deployment steps, your application and its dependencies will be updated.
If you want the changes made to the application’s code to be automatically propagated to the Plesk server, the method differs depending on whether the application’s code is stored in a local or a remote Git repository.
Updating your application automatically (local repository)
- Log in to Plesk.
- Go to Websites & Domains, find the domain hosting your application, and then click Manage Laravel Application.
- Go to the “Deployment” tab and under “Deployment mode” select the “Automatic” radio button.
- Under “Deployment scenario”, clear the checkboxes corresponding to the steps you do not want to run during deployment.
Now, every time a commit is pushed to the master branch of the local repository storing the application’s
code, your application and its dependencies will be updated.
Updating your application automatically (remote repository)
- Log in to Plesk.
- Go to Websites & Domains, find the domain hosting your application, and then click Manage Laravel Application.
- Copy the webhook URL you see here, and then add it to the remote repository. For specific instructions, see your repository provider’s documentation.
- Go to the “Deployment” tab and under “Deployment mode” select the “Automatic” radio button.
- Under “Deployment scenario”, clear the checkboxes corresponding to the steps you do not want to run during deployment.
Now, every time the event triggering the webhook takes place in the remote repository storing the application’s code, your application and its dependencies will be updated.
Configuring a Deployment Script
Your application may require certain commands to be run on the server during deployment to run properly. To avoid running the commands manually, you can configure a deployment script that will be run every time the application is updated.
If you are unsure whether your application needs any commands to be run during deployment to run properly, consult the person or organization that provided you with the application.
Note
In Plesk for Linux, you need to enable SSH access before you can edit the deployment script from the Laravel Toolkit interface. You only need to do it once.
Enabling the ability to edit the deployment script in Plesk for Linux
- Log in to Plesk.
- Go to Websites & Domains, find the domain hosting your application, go to the “Hosting & DNS” tab, and then click Web Hosting Access.
- Under “Access to the server over SSH”, select any option other than “Forbidden”, and then click OK.
You can now edit the deployment script from the Laravel Toolkit interface.
Editing the deployment script
- Log in to Plesk.
- Go to Websites & Domains, find the domain hosting your application, and then click Manage Laravel Application.
- Go to the “Deployment” tab, and then click Edit script.
- Type or paste in your deployment script, and then click Update.
The deployment script is now in effect and will be run every time you update your application.